Unadon from Japan

My grandfather turned 90 last week. He is the middle child of seven children, born to American missionaries in Japan. His father, my great-grandfather, seems to have had an all-encompassing faith that took him and his new wife from Kentucky to Japan, arriving on New Year's Eve, 1919. He was 23; she was 19. 

They lived in various locations in the country before having to return to the US in the mid-1930s, but while they worked to convert their Japanese neighbors to their Christian religion, the family developed a deep connection with the country, its people and its culture.

The Fox Family and others in Japan around 1928. George Pepperdine, founder of Pepperdine University, is seated in the middle with my grandfather's sister Ramona on his lap. My grandfather is sitting on his mother's lap all the way on the left with h…

The Fox Family and others in Japan around 1928. George Pepperdine, founder of Pepperdine University, is seated in the middle with my grandfather's sister Ramona on his lap. My grandfather is sitting on his mother's lap all the way on the left with his hand to his face.

My great-grandfather loved Japanese food and one dish in particular: unadon. Unadon is short for unagi donburri, a rice bowl with eel and a salty-sweet sauce. "It was a favorite dish of my father's," my grandfather told me. "I learned to love it," he added.

"When we'd come into the station in Tokyo, from our little town, these guys had kind of a tray and they'd run up and down [saying], 'unagi donburri!' And Pop would spring for one of those, about 35 cents, I think, which wouldn't be much."

My grandfather says it was him and a couple of brother with his father on those trips and that they would each get a small rice bowl with the eel, a real treat for missionary kids.

I assumed that making an eel dish at home would be complicated, but my friend Satoko explained that most Japanese today do not buy fresh eel and cook it at home, but rather eat it out or buy it pre-cooked. And it turns out that's possible even in the US! You can order frozen pre-cooked eel online and have it shipped to your home in just a couple of days.

Satoko helped me prepare this dish and suggested that we follow this recipe. The three components are the rice, the eel and the sauce. Satoko uses a short-grain rice and follows the proportions spelled out by the rice cooker. 

Unadon:
Serves 2-3, depending on how big your piece of eel is

Sauce ingredients:

1 1/2 tablespoons sake
1/4 cup mirin
2 1/2 tablespoons sugar
/4 cup soy sauce

Sauce instructions:

Mirin is a sweet rice wine used in many Japanese dishes. Sake is a more alcoholic rice wine. The first thing you need to do is add both the mirin and the sake to a medium pot. Bring the liquid to a boil to cook off the alcohol.

Then add the sugar, stirring until it dissolves. Add the soy sauce, lower the heat and cook until the sauce thickens, about ten minutes. Turn off the heat and set aside.

Eel instructions:

Turn on your broiler. Line a baking sheet with tinfoil and then oil the tinfoil. Cut your eel into portions that will fit the diameter of your bowls. Place each piece an inch or so away from each other. Place in your oven in the middle rack and broil on high for five to seven minutes.

Remove the baking sheet of eel and brush each slice generously with the sauce. Return the pan to the oven and broil again for another minute or so, until the sauce begins to bubble. Remove from the oven.

Assembly:

Put a large scoop of rice in each bowl. Brush the rice with some of the sauce. Place a piece of eel over the rice in each bowl. Brush more of the sauce on top. Enjoy!

Fava beans with "bacon sauce" from Germany

Recently a friend on Facebook asked if fava beans were really "very hipster limas" or "an international culinary treasure." I rallied to the defense of one of my favorite springtime treats, and even suggested a German recipe for them. My vote was for international culinary treasure status.

Fava beans are called broad beans in the UK and Dicke Bohne in Germany, which just means big beans. They regularly showed up at the work cafeteria in Bonn, cooked in what I now see is called "bacon sauce." Fava beans with bacon sauce was usually a 3-euro special, served with a sausage and some potatoes. Not especially fancy, but tasty, filling, and a good price.

I didn't even know I was eating fava beans in those days and when I got back to California and started eating fresh fava beans I still didn't make the connection. Fresh fava beans are a pain to prepare, and you won't find them at the grocery store, but that's kind of what makes them special.

Before we go any further, I should be honest with you that this is not the first dish I would make if I had come into a couple of pounds of fava beans and gone to the trouble to shell them all. Their nutty, buttery, grassy flavor is best left alone, with just a little salt. They make a nice simple chilled soup too, or a spread for crostini.

Another caveat to this recipe: I'm pretty sure that the German recipes often aren't using fresh fava beans and they probably don't go to the trouble to shell the beans twice. Yeah, I'm about to ask you to shell your fava beans twice.

Ok, so let's say you've gotten your hands on bunch of fresh fava beans, it's springtime, but the weather has suddenly turned and you're looking to make something a little more hearty. Now is the time to make fava beans with bacon sauce.

This German recipe was my inspiration. And this article goes into the history of fava beans. They may have been the first legumes eaten by humans.

Shelling fava beans:

The first thing you need to do is peel open all the fava bean pods and pop the beans out. I recommend doing this in front of the television, because it can take awhile.

Now we're going to blanch the beans. Prepare a bowl of ice water and set aside. Bring a pot of water to boil, toss in the beans. For normal preparations (especially if you're just going to eat them with nothing more than a little salt), I recommend cooking them in the water for only two minutes or so. But for this dish, a little longer, say four minutes, is better.

Now drain the beans (setting one cup of the cooking water aside) and add them to the ice water to stop the cooking process. Once they've cooled, they'll be a little wrinkly and you'll see that they actually have a skin that can be removed. Squeeze each bean gently and remove this skin from all the beans. This is where it gets really tedious! But now you should have a bunch of fava beans ready to eat or cook with.

Fava beans with "bacon sauce"
serves four as a side dish

2 cups shelled fava beans and 1 cup of cooking water (see above)
2 thick slices of bacon
3 tablespoons flour
1/2 cup milk
salt

Chop your bacon into small cubes. Cold or even frozen bacon makes this easier. Toss your bacon pieces into a hot pan over medium heat and cook until much of the fat has been released. The bacon can get a little crispy, but it's more about melting off that fat.

Turn down the heat to low and toss in the flour. Stir quickly so that the flour absorbs all the fat. Cook for a few minutes until the flour toasts a tiny bit and gets a little yellow. Then add all the milk at once and whisk quickly so that all the little bits and lumps melt into the sauce. The milk with thicken up very fast.

Stir the shelled fava beans into the sauce. Add a little of the cooking water (or more milk) as needed to keep dish from getting too dry.

Salt to taste and serve with potatoes and a good German sausage.

Pelmeni from Russia

One of the things I love about food are the common threads connecting different cultures, the similar flavors or forms popping up on different continents with different names. These tasty meat dumplings, wrapped in a layer of dough, are kind of the Russian cousins of pot stickers or tortellini. I learned how to make them at a “pelmeni party” that a Russian friend named Inna threw while we were working together in Hamburg, Germany.

KEEP6.JPG

Inna says that during her childhood in the Soviet Union, pelmeni were her favorite food and that her mother cooked them often. But with the end of communism came supermarkets and fast food restaurants, and she says her mother and most other Russians stopped making the pelmeni by hand.

Now it is very, very seldom when we cook pelmeni by ourselves; usually there is some special reason. For example, the coming of some international friends. I think in Hamburg the idea of the pelmeni party was that it was a very typical Russian food that can be made by many people and is actually fun to make.

There’s a reason most people stopped making pelmeni by hand once they could buy them ready-made and it’s the same reason it makes sense to have a pelmeni party: they’re a lot of trouble! But once you’ve made the dough and mixed up the meat, many hands will make light work of it.

After the pelmeni party in Germany, I realized that I’d actually eaten them before. In high school an exchange student from Turkmenistan, once also a part of the Soviet Union, had wanted to cook us something from home and pelmeni is what he served us.

Pelmeni
serves 4

2 1/2 cups flour (plus more for dusting your work surface)
2 eggs
1/2 cup of water
3 teaspoons salt divided
1/2 pound ground beef
1/2 pound ground pork
2 medium-sized onions
1 teaspoon pepper

Mix up the dough. You can do this by hand by piling up the flour, sprinkling 1 teaspoon salt over it and then forming a well in the middle. Break the two eggs into the well and begin mixing with a wooden spoon with only a little flour incorporated with each stir. Continue mixing, slowly adding water into the well.

Alternatively, you can use a mixer with a dough hook. Either way, knead the dough until it comes together in a nice ball but remains quite tacky. Cover the dough in a bowl and set aside. It should rest for about half an hour, which gives you time to prepare the filling.

Chop the two onions very finely. Add to a large bowl with the ground pork and the ground beef. Season the meat with salt and pepper to taste and then mix together. I used 2 teaspoons of salt and 1 teaspoon of pepper, but I always cook up a little of the meat first to be sure I’ve got the right amount.

Once you’re happy with the flavor of the filling and the dough has rested, you can start your assembly. If you have helpers, you can do all of this at once. If you’re working on your own, only work on a quarter of the dough at once and keep the rest covered so it doesn’t dry out.

Lightly flour a work surface. Divide the dough into four parts. Roll each section into a long snake and then cut into small sections.

KEEP1.JPG

Roll each section into a ball and then use your fingers to flatten each piece into a small disc.

KEEP7.JPG

With a rolling pin roll each of the discs as thin as possible, while more or less maintaining a circular shape. Place about a teaspoon of the meat filling in the middle of the circle.

KEEP4.JPG

Fold the dough in half, sealing the edges together carefully. Then bring the ends around and squeeze together.

KEEP2.JPG

Set the finished pelmeni on a sheet of parchment paper. When they’ve all been assembled, bring two pots of water to boil. Carefully add the pelmeni to the water, only as many as will fit in one layer of the pot with no crowding. You might have to cook them in a couple of rounds.

Once you’ve added the pelmeni, stir once or twice to make sure they don’t stick to each other or to the bottom of the pot. When they’ve risen to the top, cook for another five minutes.

Remove each dumpling with a slotted spoon. I’ve always eaten pelmeni with sour cream, but you can also serve them with butter or vinegar.

KEEP6.JPG

Variations and tips:

Some recipes suggest browning the onions before mixing them into the meat. Others suggest using a food processor to get the onion pieces really small.

Once the pelmeni are cooked through, they can be browned in butter in a frying pan. This is a good way to reheat leftover pelmeni too.

The pelmeni can apparently be frozen uncooked and then tossed right into the boiling water frozen. I haven’t tried this yet, but they would definitely need to cook a little longer.

Tuck a whole peppercorn into one of the pelmeni. It gives the person who finds it in his or her dinner good luck!

Masala chai from India

Our friend Rita says that when her mother was entertaining prospective suitors in India in the early 1970s, her weak chai skills weren't winning her any admirers. In those days, Rita says, the potential groom's family would visit the potential bride's family and it was custom for the young woman to make chai for everyone. When she brought the chai out, it might be the first time the two laid eyes on each other.

Rita's mother's chai was apparently "horrific," but her father was pretty progressive and they ended up marrying anyway. Masala chai is a very loose style of making sweetened, spiced tea with milk that varies by region, family and individual. "Chai" simply means tea and has some interesting etymological roots reaching back to Mandarin, while "masala" means spice mixture.

Rita visited recently and shared some tips for making some very delicious chai. It may be my new favorite hot beverage.

Masala Chai
Serves as many as you want

Indian black tea (either 1 teabag per person or 1 teaspoon of loose leaf tea)
spices (we used 3 cardamom pods and 2 cloves, Rita also recommends fresh ginger)
sugar (we used 1 heaping tablespoon per person, but this depends on how sweet you want it)
milk (we used regular milk, but Rita says it's best with evaporated milk)

Using the cup you'll serve your chai in as a measuring cup, pour one cup per person plus one into a pot and bring to a boil.

grinding.JPG

While the water is coming to a boil, grind your spices. I was excited to use my mortar and pestle for the first time, but you could also use a rolling pin and a cutting board to break down your spices a little bit. Add the spices to the water even before it comes to a boil.

Once the water is boiling, add your loose leaf tea or tea bags and let the water continue to boil for another two minutes, depending on how strong you want your tea.

Now add your sugar, give the mixture a good stir and wait another minute or so. Then slowly add the milk. This is where things get especially fuzzy, because you're just supposed to add milk until it's as pale or as dark as you'd like. Think milky tea or milky coffee and head in that direction. You might have to make this a few times to find your own sweet spot. 

milk.JPG

Adding the milk will cool down the mixture, but let it come back to a boil and stay there for about 2 minutes more. 

Your chai is ready to enjoy now! We didn't have any way to filter out the spices and tea, so we just let everything settle to the bottom and then ladled the chai into individual mugs. 

mugs.JPG

Rita's family is Punjabi and from North India. Her mother says that in that region chai is traditionally spiced with cardamom, ginger and fennel seeds, but no cloves. You can make your chai with whichever spices you like and have around, although Rita warns that many people go a bit overboard with the spices and that three is probably enough.


Strawberries, double cream and meringue from Switzerland

It's June and the strawberries are here in California! Strawberries make me think of yummy pies, strawberry shortcake and this crazy delicious dessert they make in the area around Gruyere, Switzerland. The Swiss combine perfectly crunchy meringues (non-fat but full of sugar) with double cream (no sugar but full of fat) and serve it with fresh strawberries in a dish that will blow your mind. It's reminiscent of a pavlova but better because it's even richer!

Good1.JPG

I've had this dish a few times in Switzerland and seek it out when I visit, but my favorite memory was the day we celebrated the 30th "Montee de Vache" or "taking-the-cows-up-the-mountain-for-their-summer-pasturing" of our friends who live on a farm in the Jura mountains.

First of all, the cows were all wearing their finest bells and some had multi-colored flower crowns on.

Cows.jpg

There was live music and homemade pizza from a portable pizza oven. And then when you were ready for dessert, there was double cream you could dribble over meringues and strawberries with a wooden spoon.  

Musicians.jpg

You're unlikely to find Gruyere-style double cream in your local grocery store, but you might find English double cream. And I think good-quality, full-fat creme fraiche works quite well.

Swiss double cream with meringue and strawberries
serves 6 to 8

4 egg whites, ideally at room temperature
1.5 cups powdered sugar
1 teaspoon vanilla
1 teaspoon white vinegar
2 teaspoons cornstarch
1 pound strawberries
granulated sugar (optional)
about 2 cups double cream or creme fraiche

Preheat your oven to 300 degrees Fahrenheit. Start beating your egg whites. Once they are nice and frothy, start adding your powdered sugar. This is a great time to use a stand mixer with the whisk attachment so you can easily add other ingredients while the machines keeps beating the egg whites. Add all of the sugar into the egg whites gradually and then add the vanilla, vinegar and cornstarch. 

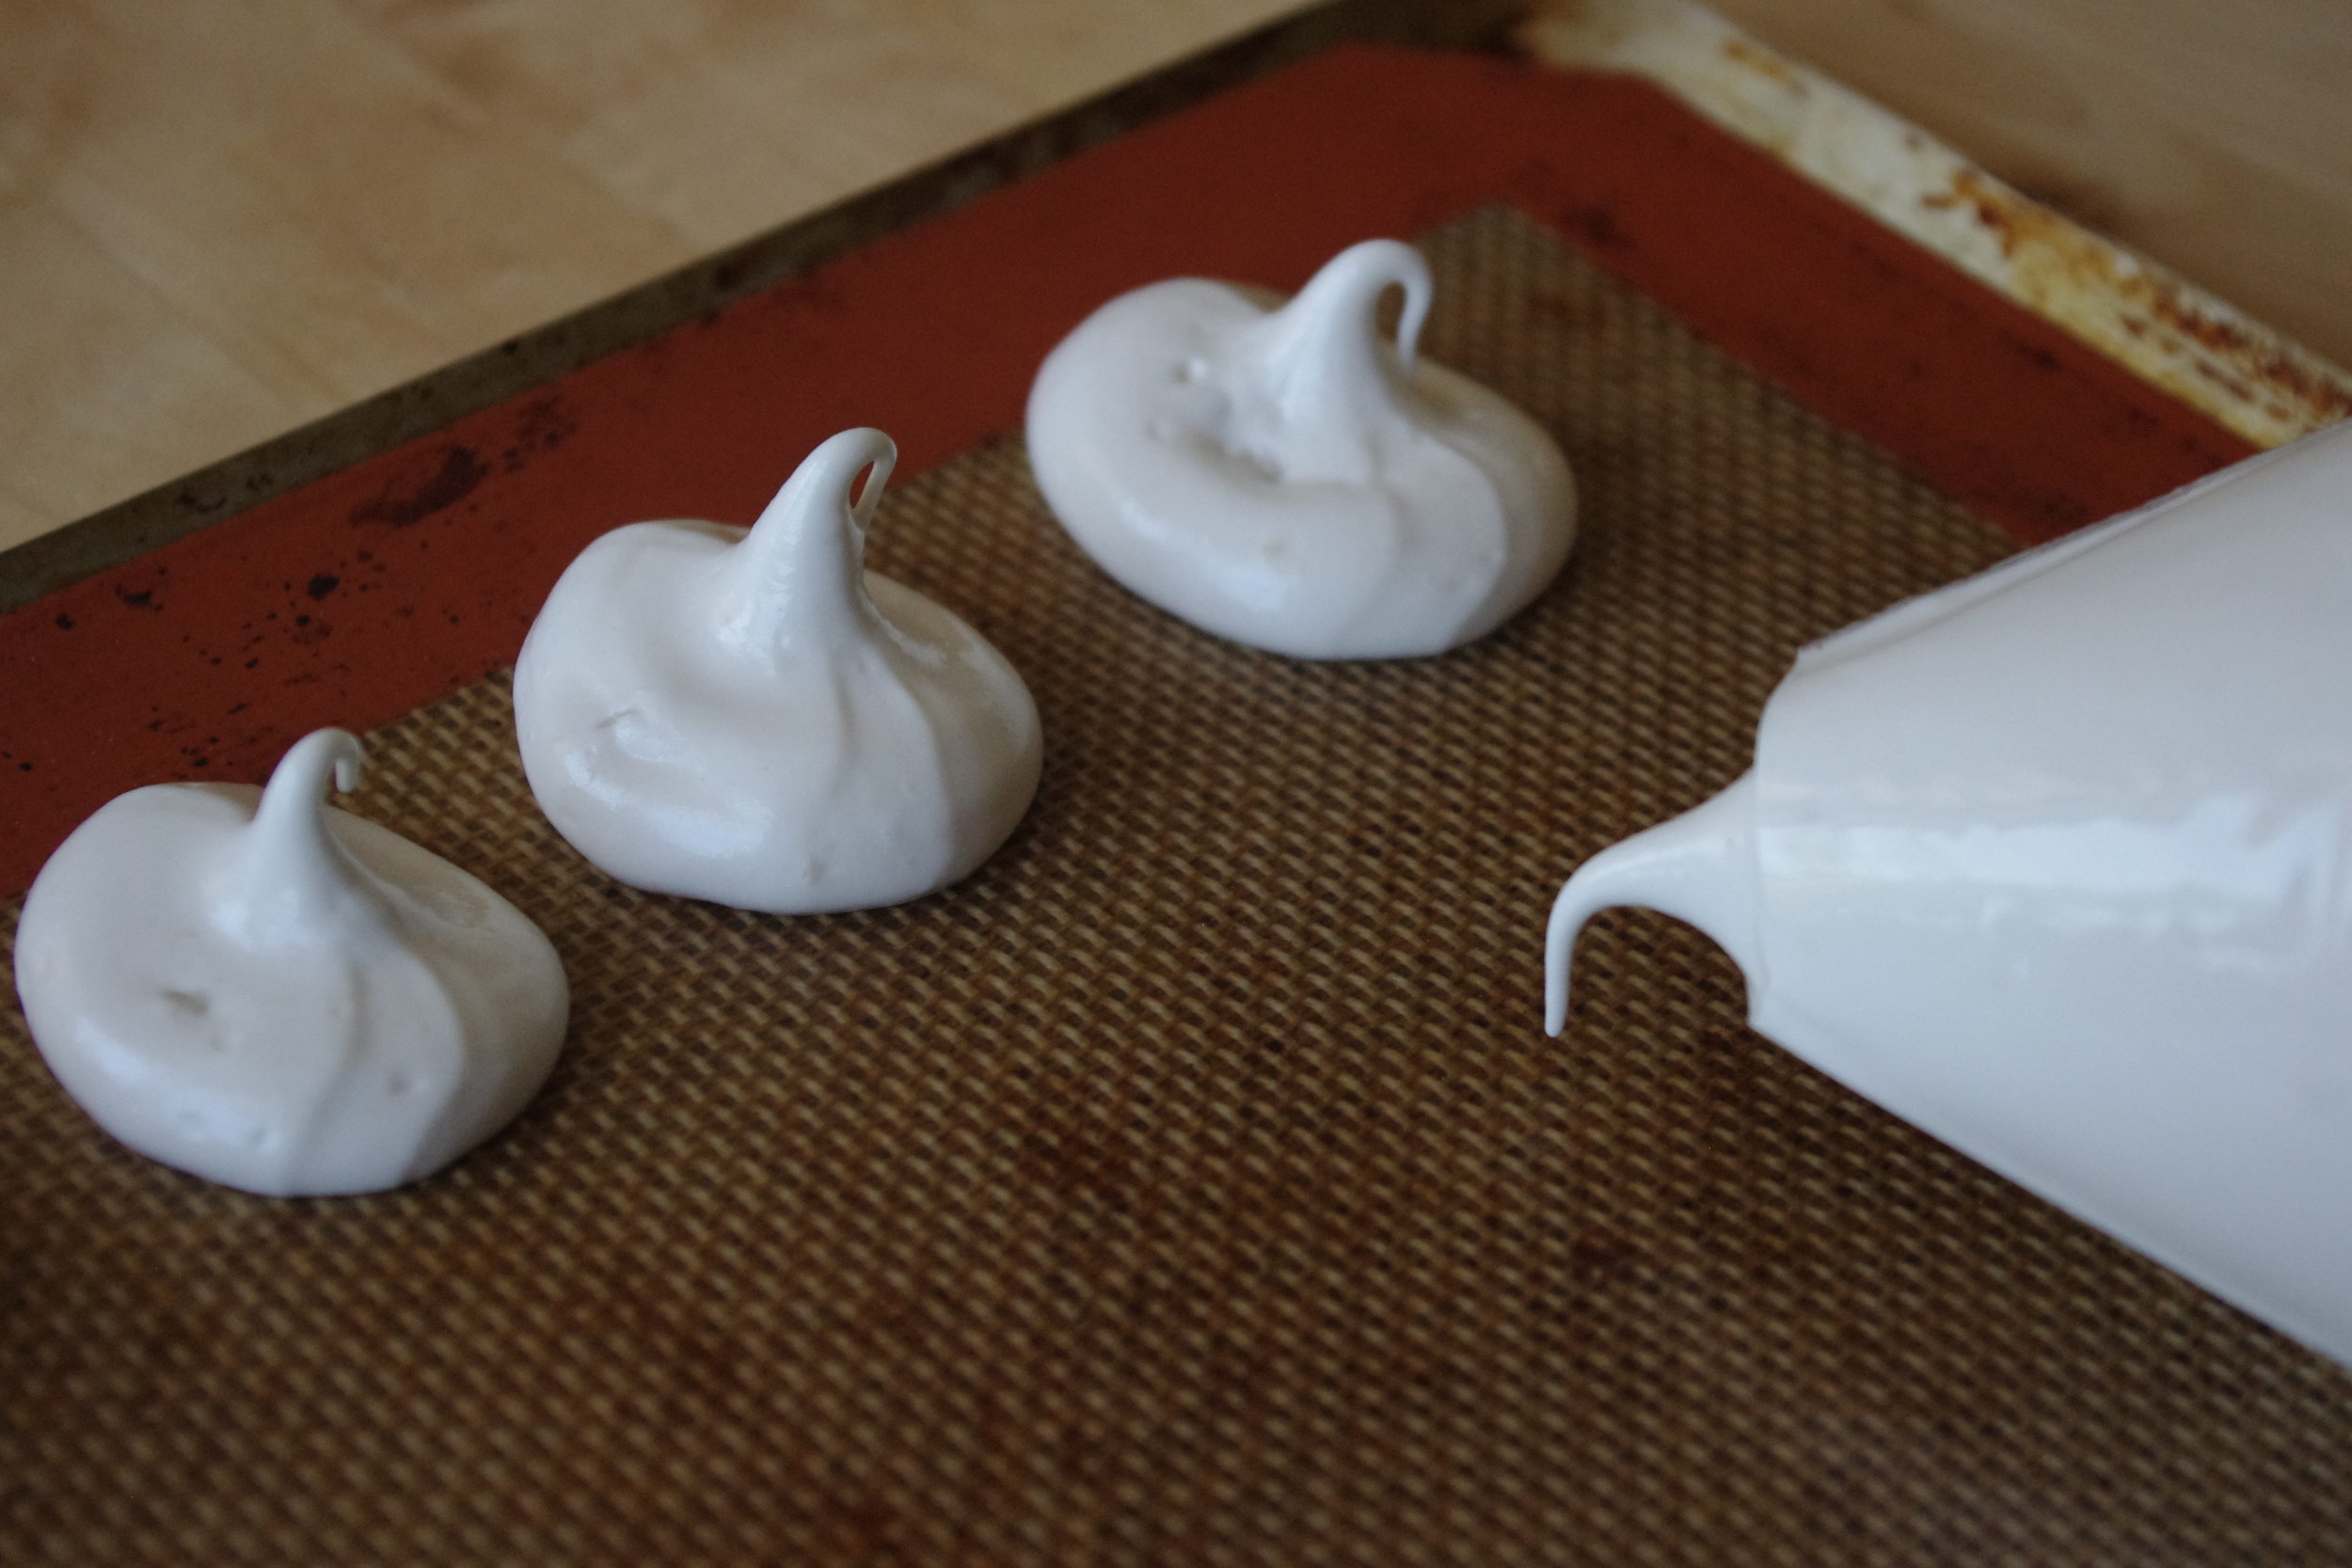
Once you start seeing stiff peaks and the meringue mixture looks nice and shiny, stop the machine and pull the whisk up to see if it keeps its shape. If so, you're ready to pipe your meringue kisses.

You could just use a spoon and create little blobs of meringue, but I find it pretty easy to use a large sealable plastic bag as a simple pastry bag. Fold the zipper part of the bag down around the outside, then scoop all your meringue into the bag. Fold the top back up and seal shut. Cut a small hole in one corner. It's better to start with a corner that's too small, because you can make it bigger but not smaller.

Good2.JPG

Squeeze the meringue onto a cookie sheet lined with parchment paper or a Silpat into kisses of about an inch diameter.

You can get them pretty close to each other. Mine were probably too close and they were very slightly stuck together when they finished baking, but they pop apart really easily.

Put all your meringues into the oven. I find that this amount of meringue is just a little bit more than one sheet can handle, but you should bake all your meringue at once. Bake for 45 minutes. Remove from the oven and let cool for another 30 minutes.

While the meringue kisses are baking, slice up your strawberries into a large bowl. Sprinkle with sugar if you'd like and let them sit for half an hour or so to macerate. This will help them release their juices and make them softer and sweeter. 

Once the strawberries and meringues are ready, it's just a matter of serving up your dessert. Put a couple of spoonfuls of strawberry slices on a plate or a bowl. If you're using double cream and it's very thick, you can spread it on the bottom of your meringue kisses like David Lebovitz does here, or if you're using creme fraiche and it's softer you can just spoon some of it over the strawberries and then add the meringues. Either way, it will taste of early summer and the Swiss mountains.